How I Made the Blue Delft Wafer-Paper Sourdough Loaf (Step-by-Step + Printable Template)
- The Sourdough Mama- Katrina Niesen
- Sep 6
- 3 min read

If you caught my reel — hello, and welcome! This loaf, inspired by classic Dutch blue-and-white pottery, has been getting so much love, and I’m excited to share the full tutorial for my new STAR version. The reel shows the highlights, but here you’ll get the dough recipe, timeline, scoring template, additional photos from every angle, and troubleshooting tips so you can make one at home.

Why I love this Blue Delft design
This loaf feels like baking with art history — rustic sourdough meets vintage Delft pottery. The blue-and-white wafer paper gives the crust a porcelain-like finish, while the scoring creates crisp lines that open beautifully in the oven. It’s delicate, timeless, and just a little unexpected on a loaf of bread.
What you’ll need
Basic sourdough boule— 72% hydration works well for this style. If you need a recipe you can find mine here!
Blue patterned wafer paper or edible rice paper
Thai Rice Flour for dusting
Sharp lame or razor blade for scoring
Cinnamon stick or small wooden skewer + ribbon for the center decoration (optional)
Baker's twine- this one is my favorite and sticks to the dough less!
Printable scoring template (linked below)
Note: This post contains affiliate links. If you purchase through one of these links, I may earn a small commission at no extra cost to you. Thank you for supporting my work and helping me keep sharing sourdough tutorials!
Pro tip: Use a tight final shaping so the loaf has a beautiful smooth surface for applying the wafer paper.
Dough timeline (example PDF on my resources page here)
Day 1
8:00 AM – Mix + fermentolyse
9:00 AM – Stretch & folds + bulk fermentation (room temp)• 7–8 hours with 3–4 sets of stretches/folds (varies by climate and dough temperature).
4:00 PM – Shape + cold proof in fridge overnight (for better flavor + scoring control)
Day 2
10:00 AM – Freeze dough briefly & preheat oven to 500°F (helps firm the dough)
11:00 AM – Bake at 430°F — covered for 15 minutes, then uncovered for 20–25 minutes more, until done
Scoring & adding the wafer paper


While your dough is still resting in the banneton, layer three pieces of baker's twine across the bottom to create six sections. Pro tip: place a circle of parchment paper between the dough and twine to prevent sticking.
Flip the dough out onto parchment paper or a BreadMat. Dust off any excess flour.
Lightly spritz the top of your dough with water.
Place the wafer paper star (or Delft-inspired shapes) gently on the surface. Glide your hand softly over the wafer paper to help it adhere.
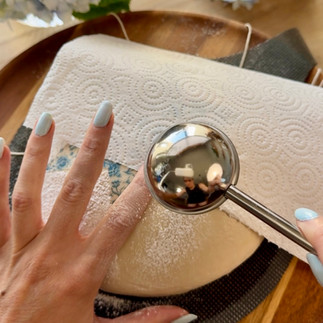
Cover the wafer paper with a paper towel, then lightly dust the top of your cold-proofed boule with Thai rice flour. Gently smooth the flour so it adheres to the dough.
Tie the strings to create six equal sections for your pumpkin—or, if you prefer, you can do this step after scoring.
Lightly score around the perimeter of the wafer paper. You can also use a wooden skewer to poke dot designs into the dough. The printable template (linked below) can help guide both cut depth and placement. For extra dimension, I like to go back and add a deep expansion score along the outer edge of each star point after the dough has baked covered for 5 minutes. I briefly pull it out, make the deeper cuts, gently lift the dough flaps, then place the lid back on and continue with the remainder of the covered bake time.
Bake in a Dutch oven—covered for 20 minutes, then uncovered for about 25 minutes. As the loaf opens, the wafer paper stays on the surface, creating that Delft pottery effect. To prevent overly browned edges, you can wrap any exposed areas with foil during the last 15 minutes of the bake.
Add a cinnamon stick + ribbon to the center after baking for a finished touch.


Troubleshooting — common issues
Splitting: As you saw with my first attempt- this is a common issue. I've learned to use deeper expansion scores and shallower decorative cuts to relieve pressure. Tying the strings looser helps as well. You can also cold proof your dough up to 3 days to help it deflate a little.
Wafer paper burning/discoloring: Covert it with a layer of foil during the uncovered portion of the bake.
Dough too slack: Lower hydration by 2–3% and be sure to cold proof your dough. Shape it tightly!
Additional Photos


Want the printable scoring template?
You can download the template below to help guide your scores and depth for the cuts. You can also use the blue star outline to help you cut your wafer paper-just print and resize to fit your dough. Happy baking!

If you try this design, tag @the.sourdough.mama on Instagram— I love seeing your creations and often share them! If you'd like more inspiration you can shop my Artistic Scoring Ebook Linked below!


Comments